
There are often some keyboard enthusiasts asking me about how to build a custom keyboard by themselves. Actually, different custom keyboards have different installation methods. Today, I will take one custom keyboard as an example to demonstrate and share some tips, assembly methods and related tools about custom keyboards with you.
Assembling a keyboard will give you a sense of accomplishment, and some configurations of custom keyboards are not in mass production. If you want to build a preferred keyboard, you may as well read the previous article and this article.
Preparation Stage of Custom Keyboard
Mechanical Keyboard Structure

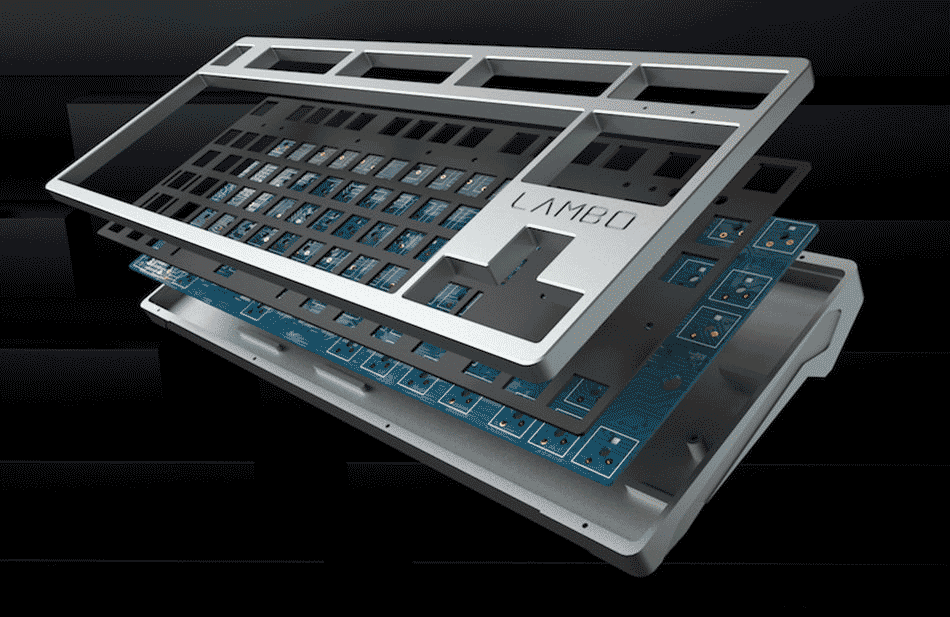
We first need to know the structure of the custom keyboard. A larger proportion of the keyboard on the market are multi-layer sandwich structures, which from the bottom to the upper layer order is the bottom case, PCB plate, positioning board, and top cover. Generally, these basic components are called custom keyboard kits.
To Select Switch
If a newcomer to mechanical keyboards wants to build a custom keyboard, he first needs to pick a key switch. Cherry Mx switch is dominant in the key switch industry, including four types:
Black switch–the best choice for the game
Blue switch–a typing magic tool
Brown switch–an all-match switch
Red switch–for lasting typing
Basic information about these four switches has been detailed in the article. If you are a blue hand and are interested in a mechanical keyboard, you can read them to help you choose a suitable switch for you.
In fact, in terms of custom keyboards, few people choose Cherry switch. Although the Cherry Mx switch actually has a variety of switches and relatively speaking its life and stability is one of the best on the market, the switch stability of the other switches is improved recently.
But in terms of paragraph switch, compared with the Cherry switch, many other switches are more brittle and enjoyable than the Cherry switch. And a few linear switches are more smooth than the Cherry switch. Most importantly, more choices are provided, such as different trigger points, paragraph points, paragraph grams, pressure grams, and the appearance of keyboards, which is more stylish. The Cherry switch’s quality control is more general, especially the red switch.
Of course, after proper lubrication, the Cherry linear switch can also be improved.
As for the paragraph switch, the famous Kailh BOX white switch is not only cheaper, but its feel is similar to that of the automatic pen when pressing up. And there are many excellent paragraph switches like it.
In addition, I would like to add some details that need to be paid more attention to inside the switch.
Switch Feet
According to the number of feet, the switch can be divided into the three-legged switch and the five-legged switch. It is simple to distinguish them. As shown in the picture:
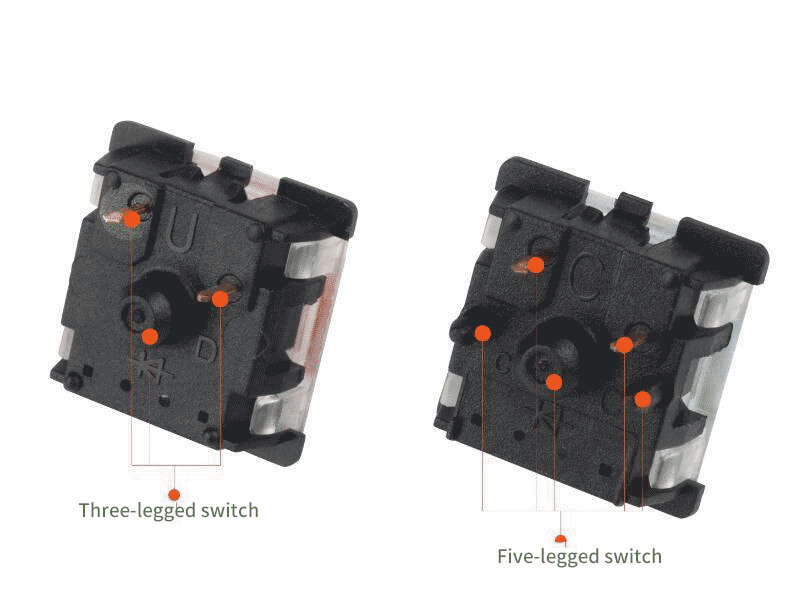
Generally speaking, the three-legged switch is suitable for keyboards with steel plates, while the five-legged switch is suitable for keyboards without steel plates.
Of course, this is not absolute. If PCB on your custom keyboard is left with five holes, the custom keyboard with the steel plate can also use the five-legged switch. And if you buy a five-legged switch but the PCB does not leave five holes, to cut off the fixed column will become a three-legged switch, which also can be used.
Inter-switch paper
Inter-switch paper is a kind of self-adhesive sticky paper added between the upper and lower covers of the switch, which includes multiple colors and styles. It is used for avoiding the invasion of dust, stabilizing the switch cover, and making the switch more beautiful.
Spring
The spring of the switch is also customized. You should know that the spring is classified according to the force “g”.
Trigger pressure: 35g-similar to red switch (similar to the feel of the electrostatic capacitive switch)
45g-Cherry red, brown, blue (actual trigger pressure of blue switch is 50g)
60g -Cherry black switch
62g.67g-Cherry white switch
80g-Grey switch
According to the material, the switch can be divided into an ordinary spring and a gold-plated spring. Gold-plated is better at rust resistance, but also more expensive.
The above is the additional content of the custom switches. I believe that after reading, you will know how to choose the switch. Of course, this is one of the benefits of custom keyboard as well–a high-degree freedom. Using which switch is totally up to you.
So think about which switch carefully.
To Select PC Plate
The secondary choice of the custom keyboard is the PCB plate, which provides few choices. I read so many articles, most of which are GH60. Green hands certainly do not know what the GH60 is, so I checked the information.
GH60 is actually a 60% custom keyboard developed by a group of keyboard enthusiasts on the Geekhack forum. GH60 is completely provided for custom keyboard players, which is mainly to meet the pursuit of the keyboard layout of a variety of players. So GH60 has a variety of layout versions for everyone to choose from and picture their favorite layout.
In addition to GH60, there are still many options. For example, EEPW 84 is very good including frequent keys and being a small size. I choose is this feeling is still very good. Some PCBs are supported to reset, but I feel completely unnecessary.
To Select Positioning Plate
You must choose the layout of your keyboard layout before determining the positioning board. In fact, if possible, you should have selected the layout before choosing the PCB plate, and then chosen the positioning board. I also thought about not using the positioning board. In fact, it is also possible.
There are three common modes:
1. without the positioning plate: Generally speaking, in accordance with experience, the use of a non-positioning board is common in the linear switch (such as: red, or black) to further eliminate noise. Using a non-positioning plate must use the five-legged switch. Although some enthusiasts are using the three-legged switch and light beads to assist in positioning, such a way has a high requirement for the switch placement and welding process and is unsuitable for general beginners.
2. stainless steel positioning plate: In my opinion, it is one of the best styles of positioning plate. Stainless steel is enough strong, which won’t deform through ordinary downward pressure and bring a crisp feel. When using a paragraph switch, users can have a wonderful mechanical feel. But it should be noted that stainless steel is generally in its native color state, and can not meet the demand for individual color customization.
3. with anodized aluminum positioning plate: thanks to the declining cost of aluminum alloy and process, the mainstream style of positioning plate is currently an anodized aluminum positioning plate.
The biggest advantage of anodized aluminum has very strong plasticity, including its style and color, which is currently the positioning plate achieving your personalized way. And many people praise the weight and hand feel caused by the deformation of the anodized aluminum positioning plate.
So, I still choose stainless steel positioning plate. As for you, depending on your taste.
To Select Keycaps
In terms of keycaps, it is the easiest and the most personalized, including a variety of patterns and various materials. The pattern is the same.
Keycap material is mainly ABS, PBT, silicone, resin, metal, etc.
These materials I do not say, and I chose PBT material keycaps not easy to oil.
The keycap printing methods are front engraved and side engraved. Front engraving keycaps are the keyboard we usually see that fonts are printed on the top. Side engraved keycaps look very neat and are not easy to wear. On personal habits, I chose the front engraving.
In addition, there is another factor taken into your consideration, that is, height. Keycaps include height, which will play a role in your user experience. You can see the different heights in the following picture.

To Select Case
Although the case is not too complicated like the switch, there are still some things to keep in mind.
60% case
Do you know why the 60% configuration case is mentioned especially? Because 60% custom keyboard has been developed for some time and the case is versatile. Therefore, basically, the normal 60% PCB can be set into the case and the vast majority of the positioning plate into the case rather than the style of the upper and lower case.
60% cases in Custom Keyboard can be divided into tall cases and short cases. As the name implies, after installation into the short case, the positioning plate is flush with and the edge of the case, and the switch will be exposed outside the case. The keyboard as a whole presents a semi-suspended state. The tall case is that its edge is taller than the positioning plate, so you can not see the positioning plate, and it looks more simple, but cleaning will be more difficult.
The screw fixing points and the inner structure of the 60% case can correspond on. And it’s better if all screws can be installed. Of course, there may be a case that can not be, which is normal as well. If the case has 6 points, 3 or 4 available screws are enough stable.
Other cases
In addition to 60% of cases, the rest cases are classified as “other”. Because most of these cases are based on the kit, that is, PCB, positioning board and case are a whole set, which has almost no compatibility problems, and many of them high-level custom keyboard kits are also the same.
There is another case. In order to make the finished keyboard more personalized, some custom keyboard manufacturers will publish some special matching cases.
You need to pay attention to two points. One is to choose a suitable case for your PCB; The other is to choose a corresponding case according to your keycaps color.
There are many case materials. The mainstream case materials are plastic, anodized aluminum, wood, latex case, etc.
The keyboard case is equivalent to its appearance, so you must know how to select the case. You should be clear about the whole process from the idea to the selection of materials.
As mentioned above, there are special kits for custom keyboards, which are simpler and less complicated than customizing every part. It will almost never have mismatched parts. The kit itself contains the PCB board, positioning board and case, etc. You can choose with or without light beads.
Next, I will show you the installation process of the custom keyboard through an example.
Operating Stage
GK87 Custom Keyboard kits

Not all keyboard kits need to be soldered with soldering irons. Custom keyboard always supports a hot-swappable program, which means the switch does not need to be soldered and can be directly plugged into the hot-swappable switch base on the PCB. The hot-swappable switch base will be welded to the PCB when finished in the factory. If you are good at operating, you can purchase a switch base and weld it to the PCB.
The kit is an 87-key kit, supporting Bluetooth 5.0 and wired modes. It has an injection-molding case, a welded hot-swappable switch base, welded RGB SMD bottom light, a lithium battery, a detachable cable design and a steel plate satellite switch.
After getting this kit, the first step is to plan the overall assembly steps.
- Remove the upper and lower covers of the kit and take out the PCB;
- Install the key-line separation module, and the lithium battery;
- Insert the switch and examine the trigger, and the Bluetooth;
- Install the satellite switch, and the switch body
- Fix key-line separation and lithium battery to the bottom, and close the cover;
- Finish.

Concrete Assemble Procedures
- Disassemble the case. First, observe whether there are screws. Without screws, you can disassemble the snap joint. Sometimes the snap joint is very tight, and you need to work with a metal pry bar to open it.
- A single PCB is not available and needs to link the key-line module with PCB through the row of wires.
- Test trigger. The key-line separation module uses a Type-C interface. Here you only need to find a Type-C cable to connect the module and then the computer can test the trigger. As the PCB itself has been welded on the hot-swappable switch base, then we can directly install the switch to the PCB, and press keys to test the trigger in turn.
- The next step is to install the steel satellite switch. It is very simple. But if you want to tune it, it will take some effort. You need to lubricate the wire, paste thickened Teflon tape cushioning, etc.
- Then you can put the positioning plate on the PCB to install the switch. Whether it is a hot plug or welding, I am used to first in the upper left, upper right, lower left, and lower right to insert the switch, and then gradually installing the rest of the key.
However, a hot-swappable switch base is not a panacea. Newcomers are still prone to meet two problems: 1) pin inserted crooked not to trigger 2) the switch base pad falls off.
For the crooked pin, you can use the IC puller to break the pin to re-operation; for the fallen pad, you can only use a line to solve, which needs you to operate carefully and use strength smartly.
(5) the next step is to fix the key-line module and the battery to the undercover. If you find that the battery is too large, you also need to use sharp pliers to cut off part of the reinforcement rib.
(6) finally, finish the cover and screws, install the brackets, paste the foot pads, and install the keycaps.
Summary Stage
Technology
Semi-finished hot-swappable products are generally not complicated, and many only need to insert the switches and then use them.
If you encounter hot-swappable keys that cannot trigger, you should first check whether the switch is inserted crooked. If there is no problem, then you can look at whether the switch base is welded. I have encountered a situation where the welding is not sufficient.
In addition, newcomers to insert the switch do not force it too hard.
Recommended tools
Pointed pliers, also called wire cutters, or diagonal pliers are extremely practical. It can be used to cut reinforcement ribs and plug-in light pins. If you plan to DIY a keyboard, you’d better buy the versatile tool.
Switch puller: a tool to pull a mechanical switch. You must have two kinds of switch pullers — an IC puller and a simple switch puller.
IC puller used to pull most of the switch is very good, and the simple switch puller looks simple, but the switch near the bezel needs a simple puller to pull.
About Hot-swapping
(1) hot-swappable means that the switch can be plugged and replaced.
(2) hot-swappable switch base may also be damaged, which is triggered by two copper clamping switches’ pins. If you often plug the switch or switches’ pins are not clean, some damage will be caused.
Hot-swappable switch base front and back
Conclusion
Custom keyboard supports customizing each component and a kit with flexible and diverse choices. In addition, the common custom keyboard kits mainly include the switch, keycaps, PCB and positioning board. Of course, if you like, the data cable, wrist rest and other small parts can also be customized.