
Are you looking for a deeper level of customization boasting amazing features, top-notch design and a distinct look? If so, creating your own custom keyboard could be the perfect solution. Whether you’re an experienced programmer or just starting out in the field, this guide will walk you through every step of building your own custom twist to typing. With a few simple tools and tips we’ll provide, making your dream keyboard is within reach! We have everything from layout overviews to keycap designs covered so let’s dive right into it and explore how easy it can be to create something that uniquely answers all of your typing needs!
Decide What Custom Keyboard You Want
The most difficult step is figuring out exactly what you want with your first custom keyboard. To make this easier, we’ll link to our recommended beginner build, which includes a list of all the components and tools you need to get started without getting stuck in analysis paralysis. Basically, you need to figure out: what size custom keyboard do you need and what features do you like?
Sizes
The beauty of a custom keyboard is that you can build a large number of different sizes. This also makes it very difficult to choose the right size, as you need to understand what all the different sizes entail and whether you find them comfortable. Here’s a quick overview of all the different custom keyboard sizes.
Full size: You won’t usually find a custom keyboard of this size, it’s only used for pre-made keyboards. If you’re lucky, you might find a full-size custom keyboard.
1800- Compact (96%): A cool layout size, axial navigation cluster and crush digital pad with the rest of the keys. You can only buy a keyboard of this size through the group.
Tenkeyless: A common keyboard layout in which the numeric keypad is removed but the rest of the keyboard layout is retained.
75%: Similar to tenkeyless, except that the navigation cluster is placed vertically to save space. It’s fun and comfortable to use.
65%: This layout removes feature rows and leaves some navigation clusters. It is also the smallest keyboard size to retain dedicated arrow keys.
60%: Most common custom keyboard layout. There are no function rows, arrow keys, or navigation clusters. The best you can do is find 60% of the parts.
40%: The minimum size at which you can still type. It’s basically 60% of the keyboard, minus the number keys. To use this site, you need to get used to typing on different layers. A 40% layout requires a long adjustment period.
Macropod: Basically, a separate digital pad to which you can assign macros. It’s fun to use with the main keyboard.
Features
RGB Lighting: If you want a light show, RGB is a good choice. There are also different types of RGB lighting, each key RGB, RGB side lighting, and down glow. It all depends on how bright you want your Settings to be.
QMK Firmware: If you need your keyboard to be programmable so you can remap keys, QMK firmware is a must. Not everyone needs a QMK, but it’s always a good addition.
USB port: Choosing a USB is important. We recommend USB-C because it is reversible. Don’t worry about plugging the cable backward. The location of ports on the keyboard is also important, depending on your preferences.
Pick Out the Parts
Building a custom keyboard requires some major components. Choosing the right parts is very important, you want to make sure they are compatible with each other.
PCB(Printed circuit board): The PCB is the lifeblood of the custom keyboard. It’s the brain and the central unit. The PCB selected determines the size, function, and layout of the custom keyboard. Make smart choices.
Case: Cases are things that put everything together and protect it from outside factors. You can choose different case materials depending on how durable, beautiful or transparent you want your keyboard to be.
Plate: The plate is an optional component, but it holds the switch in place and adds rigidity to the overall structure. Definitely recommended. There are different materials and colors available.
Stabilizers: Stabilizers determine the feel and sound of the large keyboard in use. Don’t neglect this part, it’s very important.
Switches: Switches are crucial to customize the feel and sound of the custom keyboard. There are many different types of switches, but they are mainly divided into three different types: linear, click, and tactile.
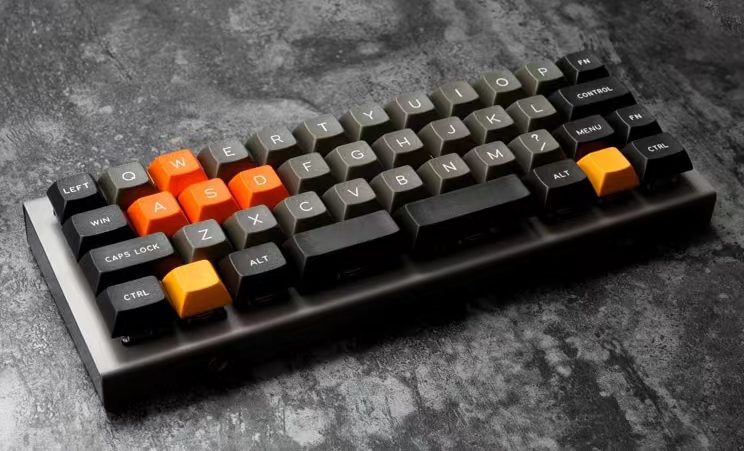
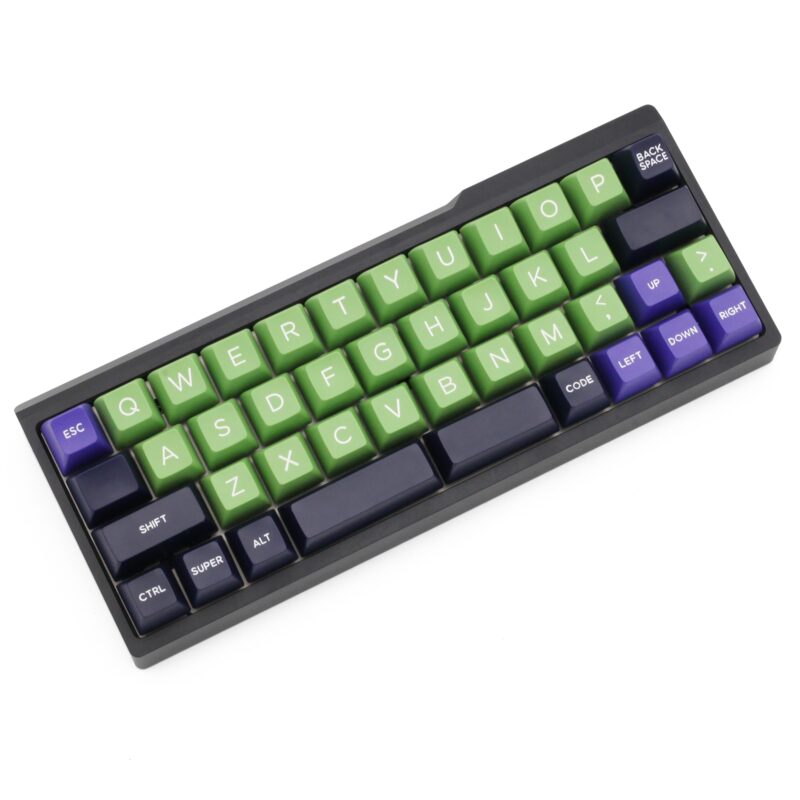
Keycap: This section really sets the aesthetics for your board. You will interact most with the keyboard cap when you sit down to type. The shape, design, and durability of the keycap are very important.
Essential Tools
Adjustable Soldering Iron-TS100: The TS100 is perfect for soldering switches, as well as helping you remove them in the event of an error. This is essential unless you have a hot swap board. It’s very portable and has a temperature-reading screen.
Solder Sucker-Engineer SS-02: The Engineer SS-02 is easy to use, easy to maintain, won’t break the bank, and helps in those moments when you know you messed up.
Solder Wire-Kester 63/37 SN/PB: Solder is essential. Using lead solder makes it easier to de-rust the switch. It’s a good size and easy to store when not in use.
Switch Puller: Easier to use than the metal switch puller you get with a hot swap plate. It comes in one or two packs, so you can do keyboard-related work in multiple places. And don’t worry about misplacing it.
Precision Screwdriver Kit: Having a screwdriver kit with different bits will come in handy when opening the case, turning on switches without an on/off switch, and putting the keyboard together.
Wire Keycap Puller: Wire keycap pullers don’t scratch your keycaps and allow you to quickly change keycaps without having to try to handle them with your fingers.
Switch Opener: Having an on/off opener will make your life a million times easier and save you time. Don’t break your nails trying to turn each switch on, just press each switch and pull them apart. Easy to peasy.
Lubricant: Having the right on-off lube makes the job easier. For lube types, the 205g0 is a great all-around lube linear and tactile switch. This is usually a more viscous lubricant. Springs are easier to lubricate, throw them in a bag with a few drops of lube in it. Then shake it. You need a little lubricant.
Test PCB to Make Sure it Works
The first thing you want to do is test to make sure your PCB works. You can plug it into your computer and test each switch with tweezers. By testing the PCB, you can ensure that everything is working properly out of the box and that you are not receiving any defects. You can test PCBS by using this free site, which allows you to test every switch and key on your custom keyboard.
Lube Your Switches
If you want to lubricate your switch, now would be a good time to do so. Basically, you need to take each switch apart and grease the lower housing, spring, stem, and upper housing. The whole process takes a few hours, but it’s a huge improvement in how it feels after the switch.
Lubricating your switches is one of the biggest upgrades you can make. It has many benefits, including less spring ping noise, less scratching, smoother keystrokes, and better sound. I recommend that everyone try to lubricate their switches, especially if you are building a custom mechanical keyboard. The only switches you should avoid lubrication are click switches, as they can mask the clicks and make each switch sound uneven.
Mod Your Stabilizers
Another step is to mod your stabilizer. You can make some quick changes to your stabilizers to greatly improve their sound and feel. Overall, this mod doesn’t take too long to make and is much faster in the assembly process. You simply apply lubricant to the stabilizer, clip the little foot off the bottom of the stabilizer, and place a small band aid on the PCB. The mod will make your typing experience more enjoyable, and combined with lubricating your switches, you will have a great feel/sound keyboard.
Install Stabilizers Into PCB
This step is to make sure you put the stabilizers in the right place to make sure they are positioned correctly. It’s easy to make mistakes here, so I like to place the stabilizer key caps on top of where they should be installed to lay out where everything is. Take your time with this step, because once the switch is installed and soldered, it will be much more difficult to come back and move the stabilizer.
Install Switches Into Plate & PCB
Now it’s time to lay out where the switches will be placed. You need to press the switch into the board and allow the pins to enter the PCB. Don’t forget the plates. If you forget the dashboard, you’ll need to go back and remove all the switches. In this step, you want to make sure that everything is positioned correctly and that none of the pins are bent.
The pins bend easily when the switch is mounted to the PCB. In this case, you’ll need to use tweezers to straighten them back out and try again. Also, if you’re going to use a dividing space bar or any other funky layout, now is the time to make sure all the switches are in the right place. If you have a hot-swappable PCB, you can skip the next step.
Solder Switches
At this point, you need to solder the switch (unless you have a hot-swappable PCB). This step can be daunting for those who have never welded before, so we recommend learning how to weld on a possible liner first. Welding may pads is a great way to learn how to weld/de-rust and get practiced to make perfect sized beads. If you want to get straight into it, you can try welding without any practice, just make sure you’re in a well-ventilated area and have all the necessary tools on hand. Solder two metal pins to the PCB through each switch.
Add Foam and Rubber Feet to The Case
At this point you will want to add foam and rubber feet to the case where the PCB is placed. Along with the case, you should get rubber feet (unless they are pre-loaded). Now is a good time to install the feet before putting in the foam. This should be a simple step, following the instructions for your particular keyboard cover.
Adding foam is an optional step, but it does improve the acoustics of the keyboard and adds some weight. Plus, it can help get rid of the spring ping noise and make everything sound bulkier (which is a good thing). This will make a difference. You need to separate the foam so it can fit in the box. I usually mark the foam with a sharpie and cut it open with scissors so it can fit in the case. Then slide the foam in and you’re good to go!

Install Assembled PCB Into Case
Now it’s time to install the PCB with switches and stabilizers into the case. This step may vary depending on the chassis installation style. Most of the time, it’s just screwing the PCB into the case, but your keyboard should come with some basic instructions for the assembly process. You want to make sure that the PCB is centered inside the case and that it does not wobble after installation.
Install the Keycaps
The keycap is where everything starts to come together. It’s an exciting process. Adding a keycap is a relatively simple process, but if you don’t know the exact location of the key, you can view the completed build online to get the key location. Once the keycap is added, the build is complete.
Conclusion
A keyboard is a very important part of a computer, and it is important to have one that suits your needs. If you are looking for a custom keyboard, there are many different ways to go about creating one. You can find a variety of companies that will create a custom keyboard for you, or you can even create your own if you are feeling particularly creative. Whichever route you decide to go, make sure to do some research first so that you end up with the perfect keyboard for your needs.